

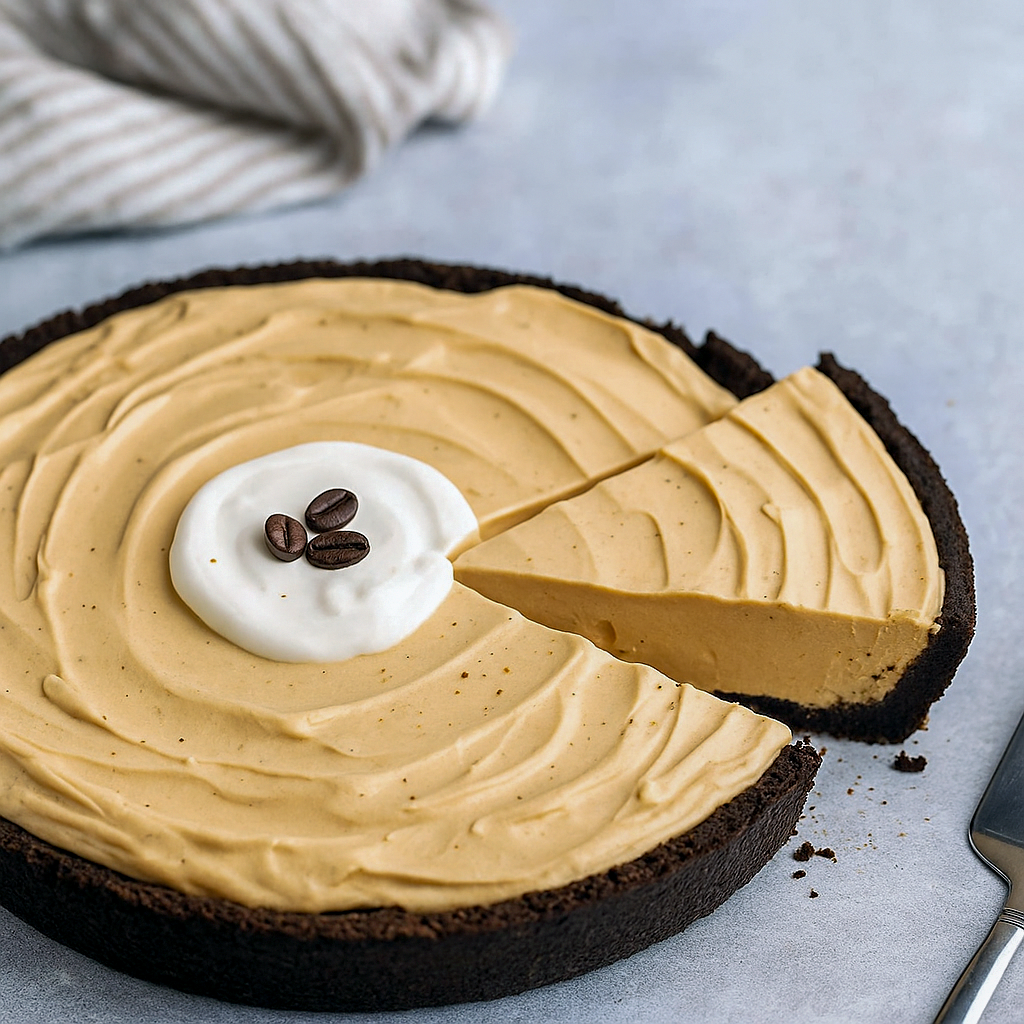
If you’re a coffee lover, this Espresso Pie might just ruin you for all other desserts (in the best way possible). Imagine everything you adore about your favorite iced latte—but creamier, dreamier, and frozen into a pie you can slice and serve at your next dinner party. Bonus? This beauty takes only six ingredients and about 20 minutes to pull together. Yep, it’s basically the poster child for a Simple Weeknight Dessert.
We’re talking a buttery Oreo crust, a rich coffee-kissed filling made with sweetened condensed milk, and a fluffy cream base that freezes into sliceable perfection. If your freezer isn’t currently housing one of these pies, I have one question: why not?
The Story Behind My Coffee Obsession (and This Pie)
Let’s rewind to my first bite of Trader Joe’s Mud Pie years ago. Creamy coffee filling, chocolatey crust, cold and decadent enough to count as both dessert and late-night snack. It was love at first forkful. Sadly, that pie disappeared from shelves, and I’ve been chasing its memory ever since.
Enter: this homemade Coffee Cream Pie Recipe. It’s the closest I’ve ever come to recreating that nostalgic flavor, but with my own twist. Honestly, I think it’s even better. It’s taller, creamier, and—dare I say—more addictive.
Why This Espresso Pie Is Amazing
Here’s the rundown of why you need this pie in your life:
- Only 6 ingredients. Nothing fussy, nothing hard to find.
- No oven required. It’s a champion among No Bake Cream Pie Recipes.
- 20 minutes of effort. The hardest part is waiting for it to freeze.
- Perfect make-ahead dessert. Which makes it ideal for holidays, birthdays, or any time you want dessert on demand.
- Coffee shop vibes in pie form. Because “Pies For Dinner” should totally be a thing.
Ingredient Line-Up (and Why Each Matters)
- Oreos – The real MVP. I stick with regular, not double-stuffed, because the ratio of cream-to-cookie is just right for crusts.
- Butter – Melted, to hold that crumb base together. Salted or unsalted, whatever’s in your fridge.
- Heavy cream – This is the backbone of the filling. It whips into soft clouds, giving that luscious mousse-like texture. Basically, it proves why Dessert Using Heavy Cream is always a win.
- Powdered sugar – Not just sweetening power, but also stability so the filling holds its shape.
- Espresso powder – Don’t sub in instant coffee. This is what gives the filling its deep, bold coffee flavor.
- Sweetened condensed milk – The star of every good Pie With Condensed Milk. It sweetens, thickens, and adds that signature creamy body.
How to Make Espresso Pie (Step by Step)
- Crush the Oreos. A food processor works best, but a rolling pin and zip-top bag work too (and double as stress relief).
- Mix with butter. Press into a 9-inch pie pan. Use firm pressure—your future slices will thank you.
- Whip the cream. Beat heavy cream, powdered sugar, and espresso powder until stiff peaks form. This takes about 6–7 minutes, so be patient.
- Add condensed milk. Mix gently on low, scraping down the sides so nothing hides at the bottom.
- Fill the crust. Smooth the filling into the pie shell, swirl the top (because fancy), and freeze uncovered for about 6 hours.
- Slice and serve. Cue the applause.
Pro Tip: Keep your cream extra cold before whipping. Cold cream = maximum fluff.
Pro Tips for Pie Success
- Press hard on the crust. A measuring cup with a flat bottom works wonders here. No crumbly disasters on my watch.
- Don’t overmix. Once the condensed milk is in, mix gently. Too much beating = deflated filling.
- Pretty matters. Freeze uncovered at first, so the top stays picture-perfect before you wrap it.
- Serve chilled. This is not a pie you want hanging around at room temp—it belongs in the freezer until showtime.
Variations to Try
- Mocha Madness: Add a tablespoon of cocoa powder to the filling to mimic Chocolate Cream Pie Bars flavor with a coffee kick.
- Nutty Espresso: Sprinkle crushed hazelnuts or almonds on top before freezing.
- Boozy Twist: A splash of coffee liqueur in the filling = grown-up pie goals.
- Mini Pies: Divide the filling among muffin tins for single-serve treats.
Best Way to Serve
This pie shines at dinner parties. Bring it out of the freezer, let it sit at room temp for 5 minutes to soften slightly, then slice into tall wedges. Pair with an actual espresso shot for the ultimate double-caffeine moment.
And yes, IMO, this totally counts as Pies For Dinner when you’ve had a long day. No judgment here.
Storage & Leftovers
- Keep frozen for up to 2 months.
- Wrap tightly in plastic wrap, then a layer of foil for best freezer protection.
- To keep tall slices intact, try storing it under a cake carrier lid in your freezer.
FAQs About Espresso Pie
Q: Can I use instant coffee instead of espresso powder?
A: Technically yes, but it won’t taste as bold. Espresso powder is smoother, richer, and makes all the difference in Coffee Cream Pie Recipes.
Q: Do I need to bake the crust?
A: Nope. That’s the beauty of this dessert—it’s a card-carrying member of the No Bake Cream Pie Recipes club.
Q: Can I make this pie ahead of time?
A: Absolutely! It actually gets better the longer it chills. Make it a day or two ahead and you’ll be party-ready.
Final Thoughts
If you’ve been looking for a dessert that’s part frozen latte, part indulgent pie, and 100% show-stopper, this Espresso Pie has your name written all over it. With just six ingredients and no oven time, it’s proof that the best desserts are sometimes the simplest.
So go ahead—whip this one up for your next gathering, keep one stashed in the freezer “just because,” or surprise your coffee-obsessed bestie. Just don’t expect leftovers. 😉
Print

Espresso Pie – Simple Weeknight Dessert with 6 Ingredients
- Prep Time: 20 minutes
- Freezing Time: 6 hours
- Total Time: 6 hours 20 minutes
- Yield: 8 -10 Servings
- Category: Desserts
Description
Looking for a dessert that tastes like your go-to iced latte but in pie form? This frozen espresso pie is rich, creamy, and ridiculously simple to make. With a crunchy Oreo crust and a fluffy coffee filling, it’s proof that you don’t need a ton of ingredients—or an oven—to whip up something truly spectacular. Just mix, freeze, and dig in!
Ingredients
- 25 Oreo cookies
- 4 tablespoons melted butter
- 3 cups cold heavy cream
- ½ cup powdered sugar
- 2 tablespoons instant espresso powder
- 1 (14-ounce) can sweetened condensed milk
Instructions
- Make the crust.
- Toss the Oreos into a food processor and blitz until they’re fine crumbs. Add the melted butter and pulse until the mixture looks like damp sand.
- Form the base.
- Pour about two-thirds of the cookie crumbs into a 9-inch deep-dish pie pan. Press them firmly along the sides of the pan using your fingers or the bottom of a measuring cup. Add the rest of the crumbs to the bottom and press down firmly until you’ve got a sturdy crust.
- Whip the cream mixture.
- In the bowl of a stand mixer (or use hand beaters), combine the heavy cream, powdered sugar, and espresso powder. Beat on high speed until stiff peaks form—this usually takes 6–7 minutes.
- Add the condensed milk.
- Pour in the sweetened condensed milk and mix on low for 30 seconds. Stop, scrape the bowl well, and then mix for another 30 seconds until smooth.
- Assemble and freeze.
- Transfer the filling into the prepared crust. Smooth the top or create swirls for a decorative finish. Freeze the pie uncovered for at least 6 hours. Once fully solid, wrap in plastic wrap (and foil if you like) to store until serving.
- Serve and enjoy.
- Let the pie sit at room temperature for about 10 minutes before slicing. Grab a fork and enjoy every creamy, coffee-filled bite.
Notes
Helpful Notes & Tricks
- Press that crust hard. The firmer you press, the less crumbly your slices will be later.
- Mix gently after adding condensed milk. Overbeating will flatten the airy texture of the filling.
- This pie is tall! Store-bought crusts are too shallow, so stick with homemade unless you want to use the extra filling for parfaits or mini cups.
- Make-ahead magic. Wrap well in plastic (and foil if you want) and store in the freezer for up to 2 months.
Variations & Extra Ideas
- Use mini pans for individual servings.
- Swirl melted chocolate or caramel on top before freezing.
- Fold in chopped Oreos for extra crunch.
- Extra filling? Layer it in cups with whipped cream and cookie crumbs for parfaits.
Nutrition
- Serving Size: 1 slice
- Calories: 720 kcal
- Sugar: 52 g
- Sodium: 278 mg
- Fat: 49 g
- Saturated Fat: 29 g
- Trans Fat: 0.3 g
- Carbohydrates: 65 g
- Fiber: 1 g
- Protein: 9 g
- Cholesterol: 133 mg